Purpose of this articles are as proof of concept (POC) of these:
- The use case of XaaS is Enterprise PKS as service using VRA (creation, manage, and destroy)
- XAAS using combined of custom resource, xaas blueprint and resource actions
1. Enterprise PKS as service from VRA
Assumption in this articles:
- Ent-PKS has been successfully installed and integrated with NSX-T
- Ent-PKS configures using OIDC and integrated with AD/LDAP domain. See my previous artice PKS with LDAP
- VRA-7 (VIDM) directory sources integrated with AD/LDAP domain
- AD-DNS already configured and dnscmd working properly. This is for automatically creating DNS host record for K8S cluster ip with external fqdn
Showcase of Ent-PKS as service:
- Self Service Catalog
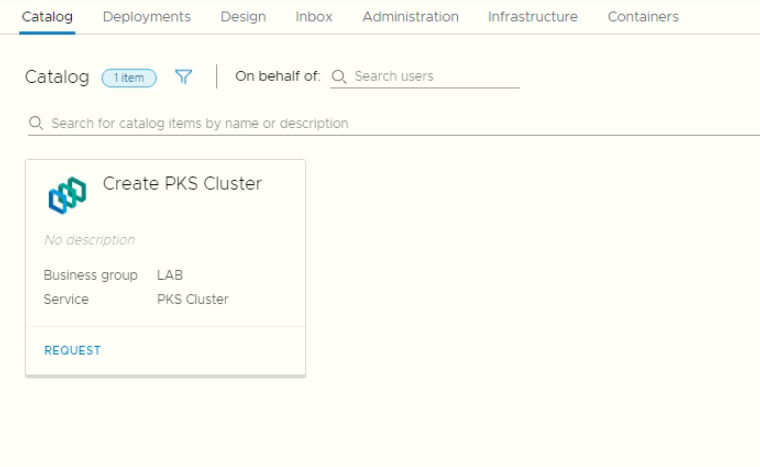
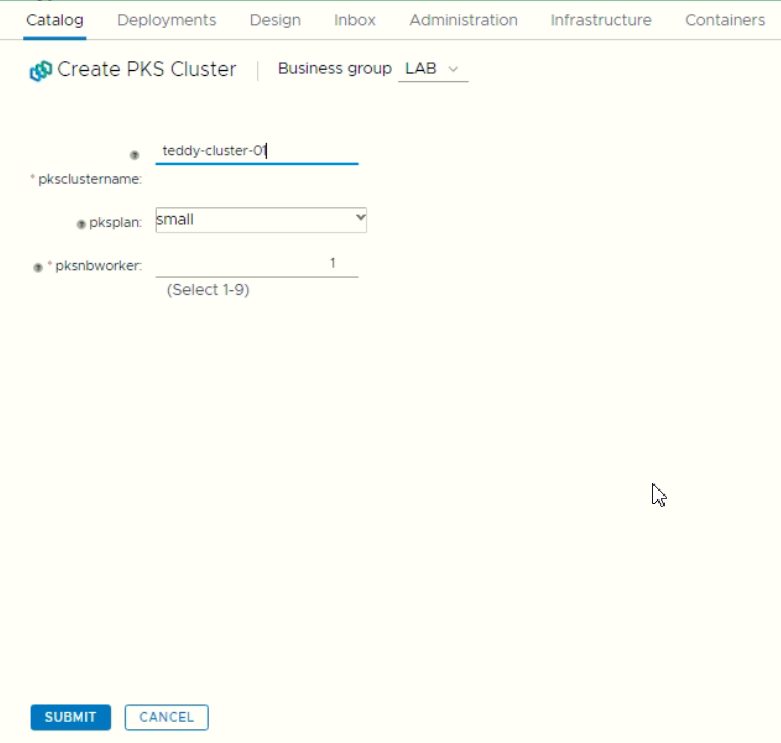
- Creating the K8S Catalog
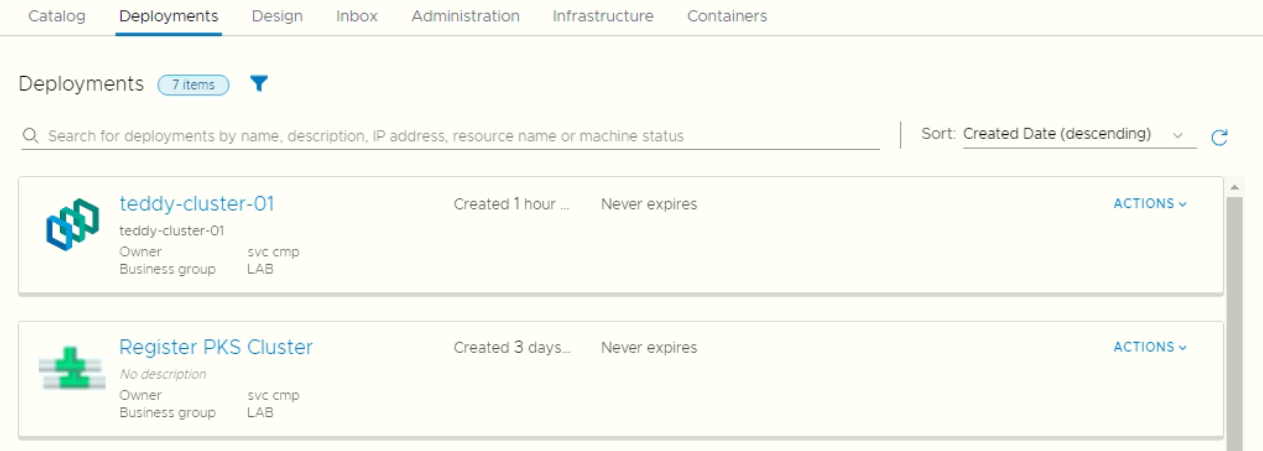
- After deployment success, the K8S cluster appeared as managed object in VRA
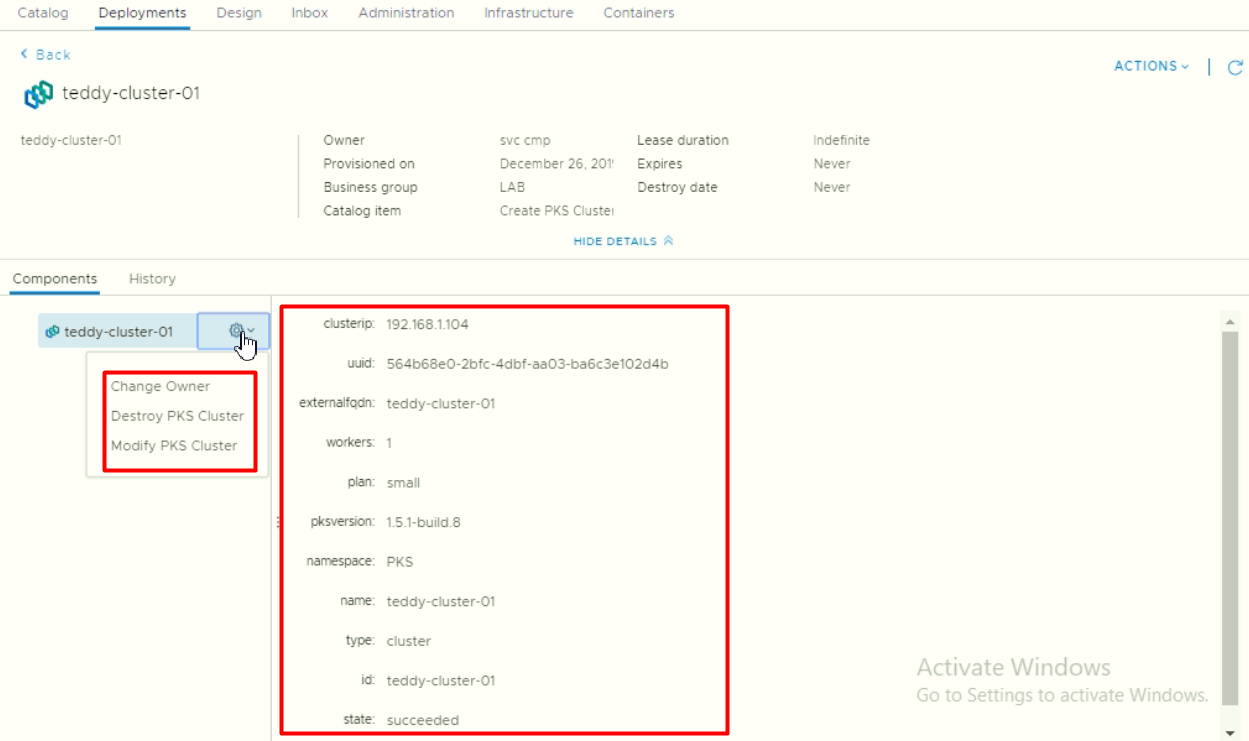
- We can check the detail of PKS deployment including available actions
The requestor then get confirmation email that deployment is success. Below is sample email template
1
2
3
4
5
6
7
8
9
10
11
12
13
14
15
16
17
18
19
20
21
22
23
24
25
26
27
28
29
30
31
32
33
34
35
36
37
38
39
40
41
42
43
44
45
46
47
48
49
50
51
52
53
54
55
56
57
58
59
60
61
62
63
64
Kubernetes has been successfully created using version 1.15.5
Cluster FQDN: teddy-cluster-01.cmpvmware.id
Cluster IP: 192.168.1.104
Kubernetes Cluster Sizing: small
Total 1 x Master/ETCD VM with size 2vCPU and 7.5GB RAM
Maximum workers with above sizing are 10 nodes
Total 1 x Worker VM with size 8vCPU, 16GB RAM, and 64GB Disk
Procedure to access K8S cluster:
1. Download these pks and kubebctl binaries
- For Linux client, download these 2 files:
linux kubectl (https://vracmp7.cmpvmware.id:5480/artifacts/software/pks/kubectl)
linux pks (https://vracmp7.cmpvmware.id:5480/artifacts/software/pks/pks)
- For Windows client, download these 2 files:
windows kubectl (https://vracmp7.cmpvmware.id:5480/artifacts/software/pks/kubectl.exe)
windows pks (https://vracmp7.cmpvmware.id:5480/artifacts/software/pks/pks.exe)
2. Run this command on your client to get kubectl config then enter your domain password:
pks get-kubeconfig teddy-cluster-01 -a pksapi01.cmpvmware.id -k -u svc-cmp
4. Test privilage to get number of nodes:
kubectl get nodes
Additional Notes:
A. Accessing Harbor as Private Registry:
1. Get the ca certificate:
ca.crt (https://vracmp7.cmpvmware.id:5480/artifacts/software/pks/ca.crt)
2. Store ca.crt into /etc/docker/certs.d/harbor01.cmpvmware.id/ca.crt:
3. Login into private registry then enter your domain password:
docker login harbor01.cmpvmware.id -u svc-cmp
B. standardsc is a StorageClass that use predefined datastore in the vSphere config using Thin Provisioning.
# kubectl get sc
NAME PROVISIONER
standardsc kubernetes.io/vsphere-volume
C. Expose the workload through a load balancer. Sample yaml configuration:
kind: Service
apiVersion: v1
metadata:
labels:
name: weblb
name: weblb
spec:
ports:
- port: 80
selector:
app: webfront
type: LoadBalancer
D. Accessing kubernetes dashboard:
1. Get OIDC token from your own kubeconfig file.
a. For Windows kubctl, run: kubectl config view -o jsonpath="{.users[?(@.name == 'svc-cmp')].user.auth-provider.config.id-token}"
b. For Linux kubctl, run: kubectl config view -o jsonpath='{.users[?(@.name == "svc-cmp")].user.auth-provider.config.id-token}'
2. Start the proxy server run the following:
kubectl proxy -p 8001
3. To access the Dashboard UI, open a browser and navigate to the following:
http://localhost:8001/api/v1/namespaces/kube-system/services/https:kubernetes-dashboard:/proxy/
4. Copy paste the token into kubernetes dashboard
E. Sample Tiering Application Deployment:
1. Download sample yaml file:
cnawebapp-loadbalancer.yaml (https://vracmp7.cmpvmware.id:5480/artifacts/software/pks/cnawebapp-loadbalancer.yaml)
2. Deploy from kubernetes:
kubectl apply -f cnawebapp-loadbalancer.yaml
3. Get load balancer IP Address in "EXTERNAL-IP"
kubectl get svc
4. Open the browser to http://loadbalaceripaddressAs platform admin (pks cluster admin), we can check the deployment status
1
2
3
4
5
6
7
8
9
10
11
12
13
14
15
[root@cmppksclient ~]# pks cluster teddy-cluster-01
PKS Version: 1.5.1-build.8
Name: teddy-cluster-019
K8s Version: 1.14.6
Plan Name: small
UUID: 564b68e0-2bfc-4dbf-aa03-ba6c3e102d4b
Last Action: CREATE
Last Action State: succeeded
Last Action Description: Instance provisioning completed
Kubernetes Master Host: teddy-cluster-01
Kubernetes Master Port: 8443
Worker Nodes: 1
Kubernetes Master IP(s): 192.168.1.104
Network Profile Name:Check also that DNS Host record successfully created
1
2
3
4
5
6
[root@cmppksclient ~]# nslookup teddy-cluster-01
Server: 192.168.100.55
Address: 192.168.100.55#53
Name: teddy-cluster-01.cmpvmware.id
Address: 192.168.1.104Modify existing deployed PKS cluster
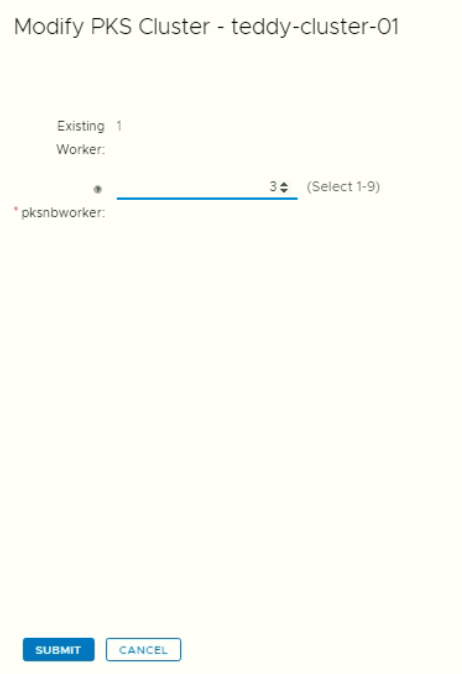
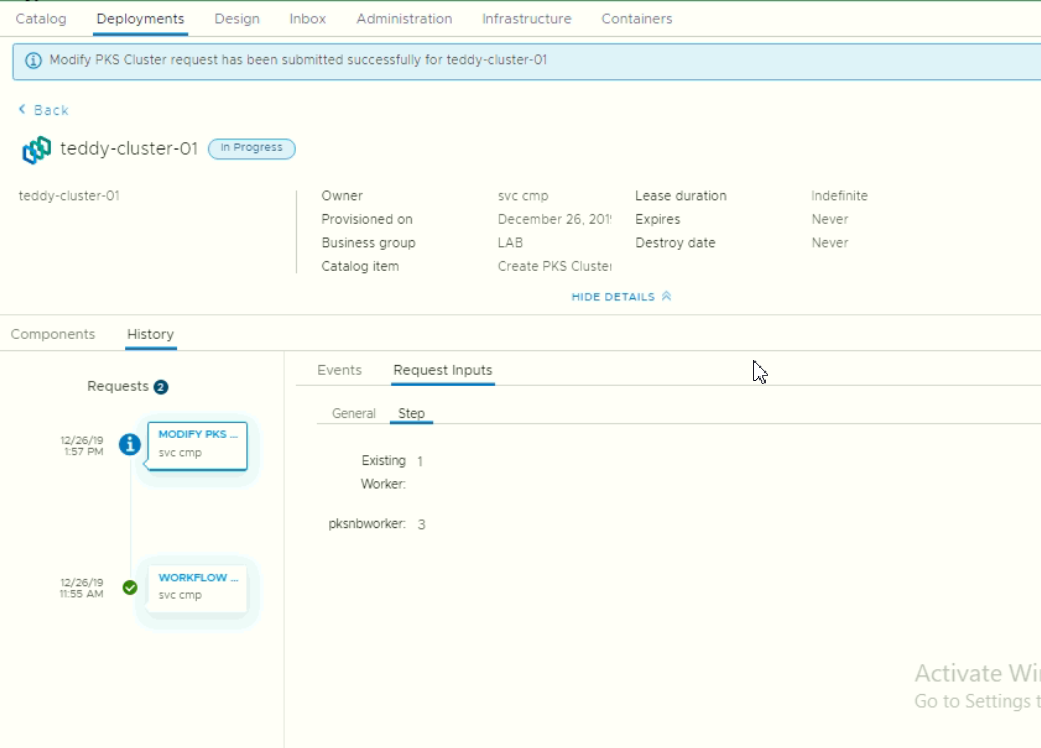
- We can then check the action history performed against this deployment
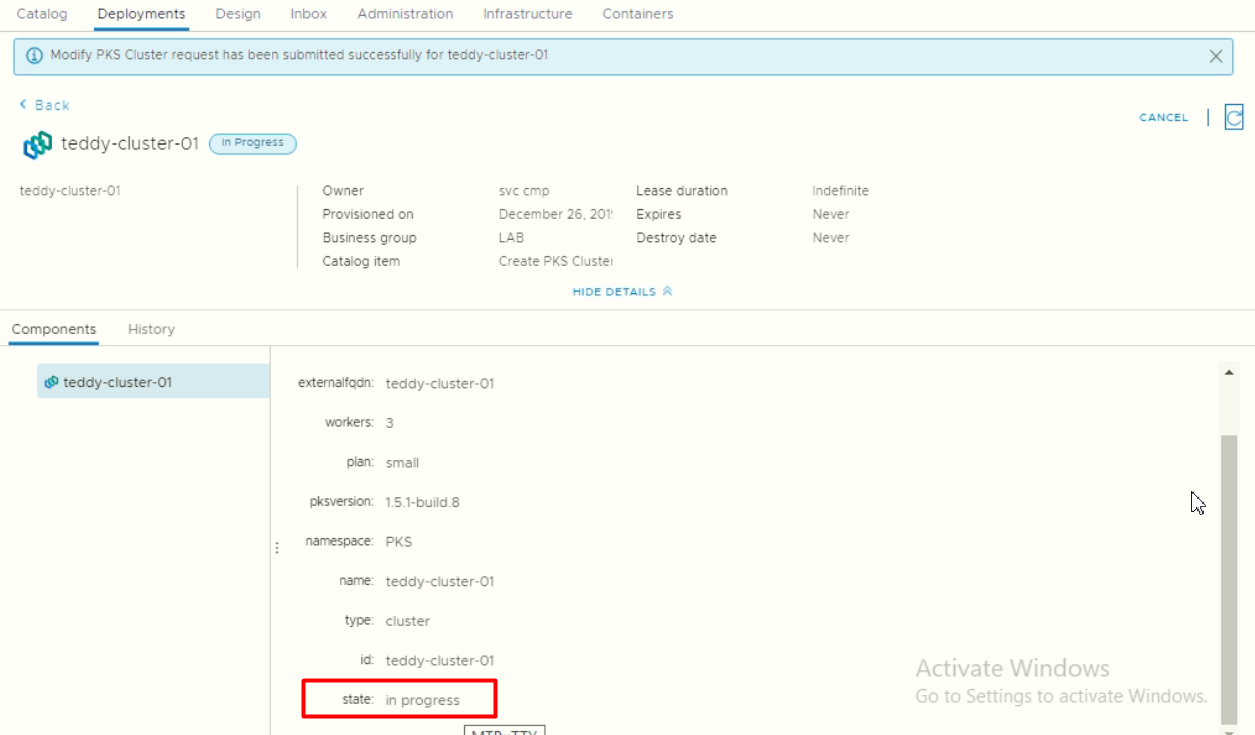
 We can also see the detail while status in progress
- As platform admin (pks cluster admin), we check again the deployment status after modifying the number of workers
1
2
3
4
5
6
7
8
9
10
11
12
13
14
15
16
[root@cmppksclient ~]# pks cluster teddy-cluster-01
[root@cmppksclient ~]# pks cluster teddy-cluster-01
PKS Version: 1.5.1-build.8
Name: teddy-cluster-01
K8s Version: 1.14.6
Plan Name: small
UUID: 564b68e0-2bfc-4dbf-aa03-ba6c3e102d4b
Last Action: UPDATE
Last Action State: in progress
Last Action Description: Instance update in progress
Kubernetes Master Host: teddy-cluster-01
Kubernetes Master Port: 8443
Worker Nodes: 3
Kubernetes Master IP(s): 192.168.1.104
2. Brief XaaS configuration specific for Ent-PKS as service
In briefly, in VRA-7 in order to build XaaS, the steps:
a. In VRO: Develop plugin or dynamic types. (This articles only cover how to build dynamic types).
b. In VRA: Create Custom Resources to enable vRO objects (in this case dynamic types) to be mapped as a manageable object in vRA.
c. In VRA: Create XaaS Blueprints as Catalog Items in the Service Catalog.
d. In VRA: Create Day2 Resource Actions to target Custom Resources.
e. In VRA: define service and entitlement
a. Develop Dynamic Types as target custom resources
Here’s the dynamic types inventory will look like: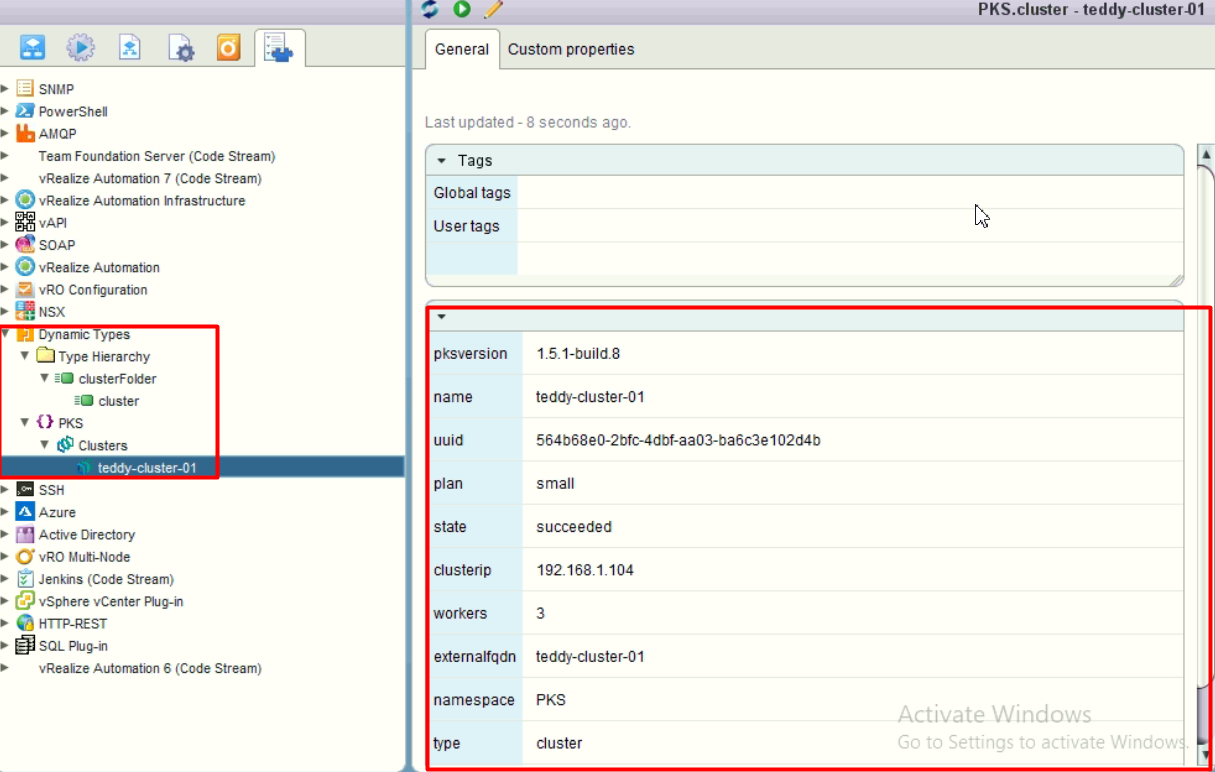
There’s two steps in this, defining the structure and then the coding.
The steps to defining the dynamic types structure:
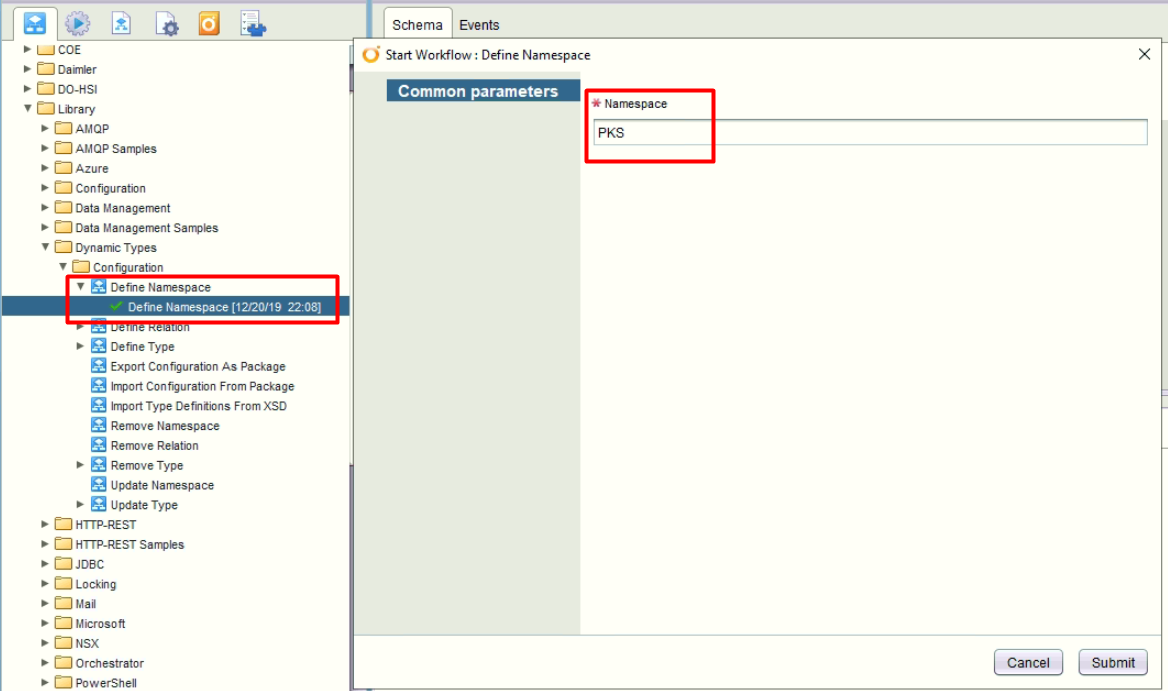
- Create namespace as dynamic type object structure
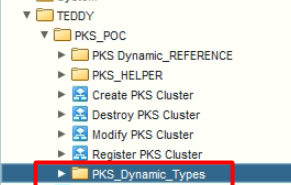
- Create Workflow folder to contain dynamic type workflows
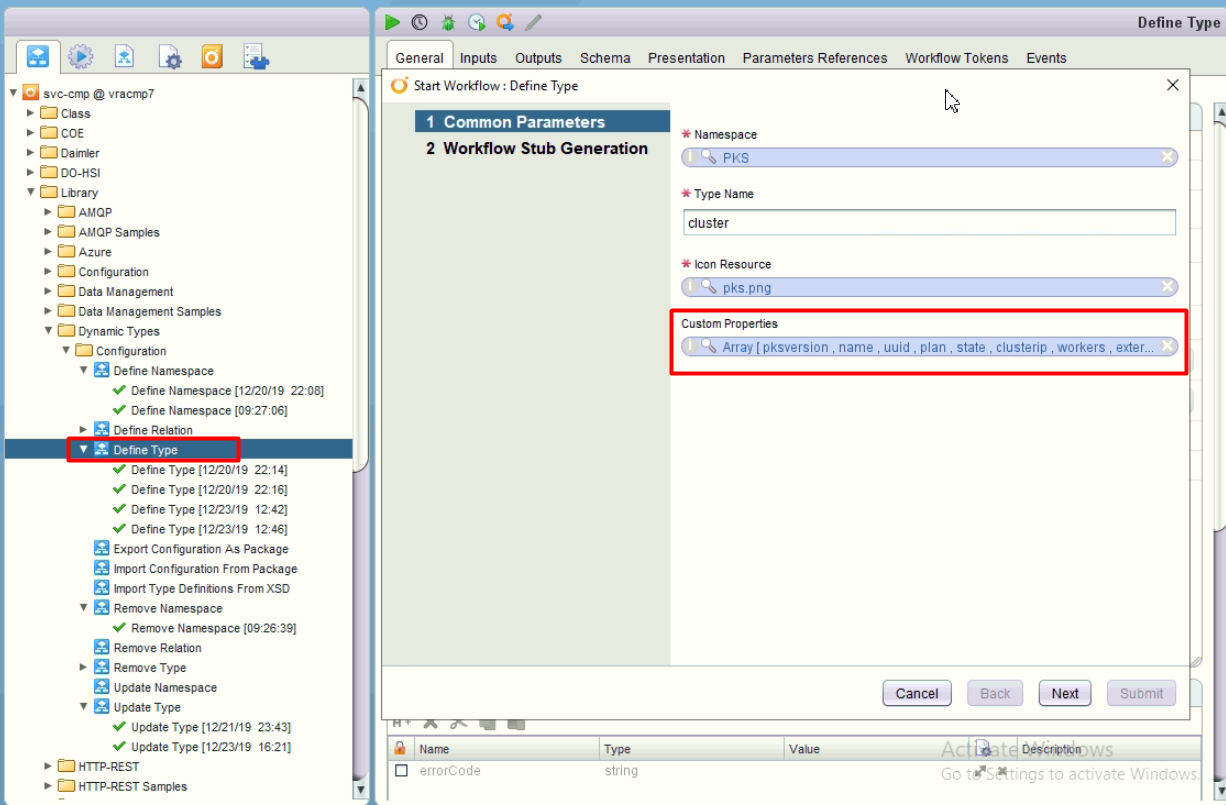
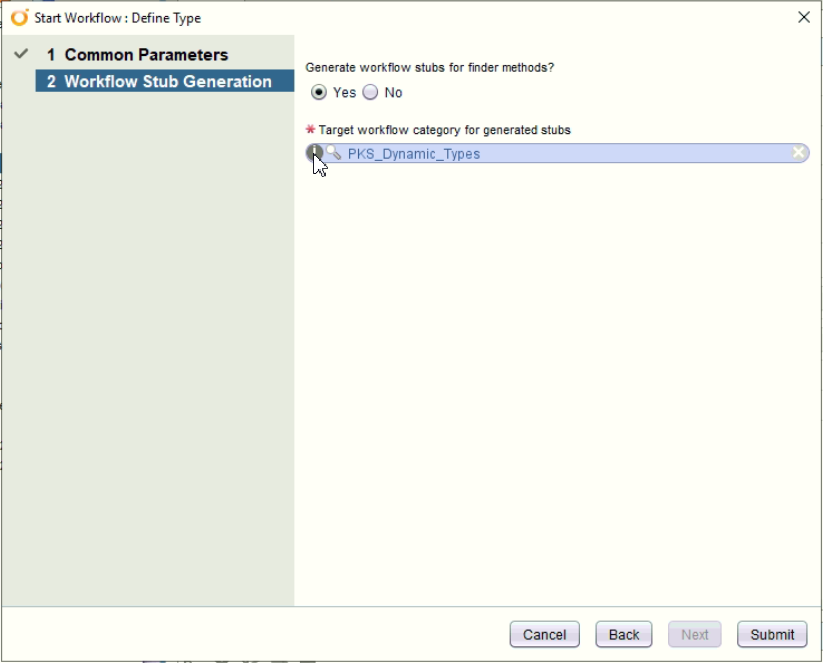
- Define types as reference object. Put the namespace reference, icon, and also requireed custom properties. Then define the workflow folder
- Define another types to contain the objects. Put into same folder
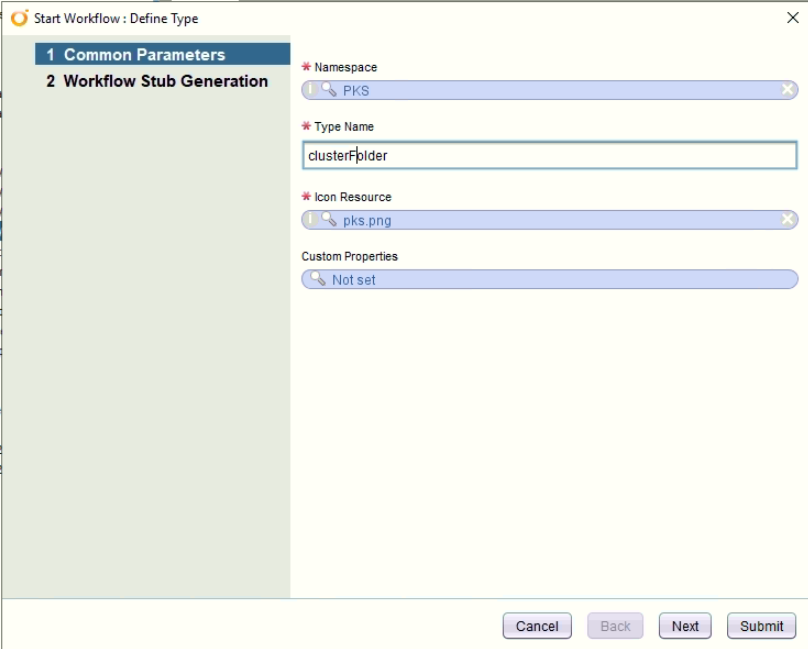
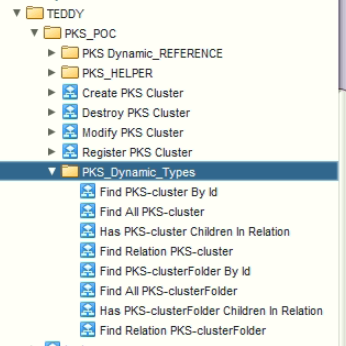
- Check the created workflows
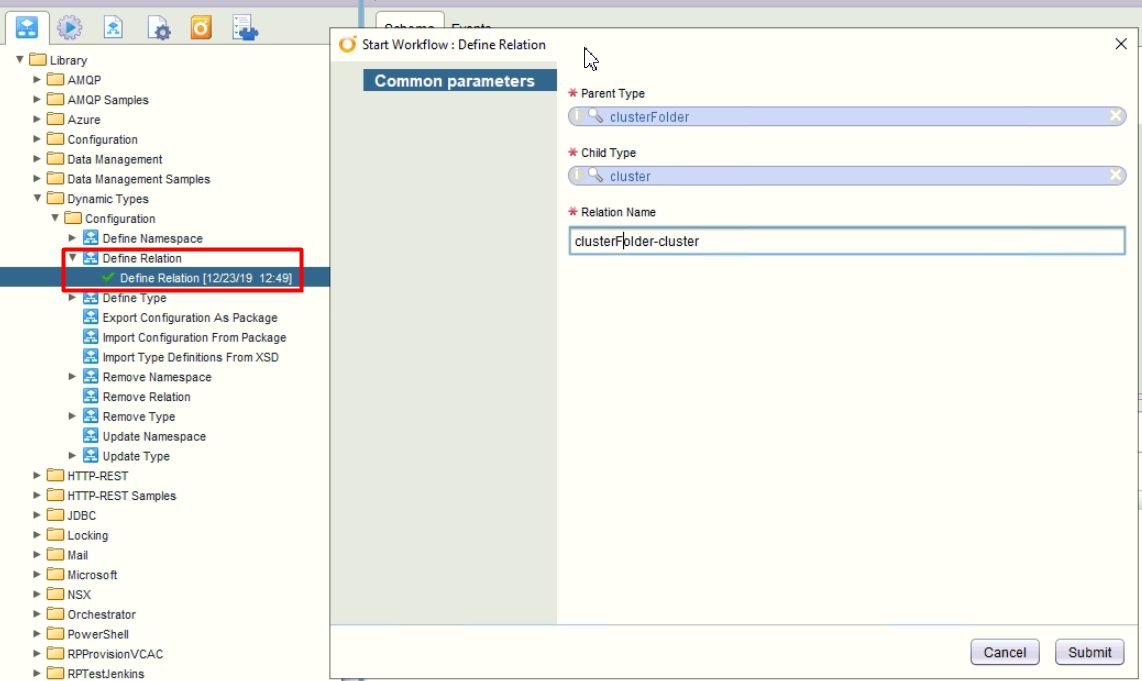
- Define relations between both types
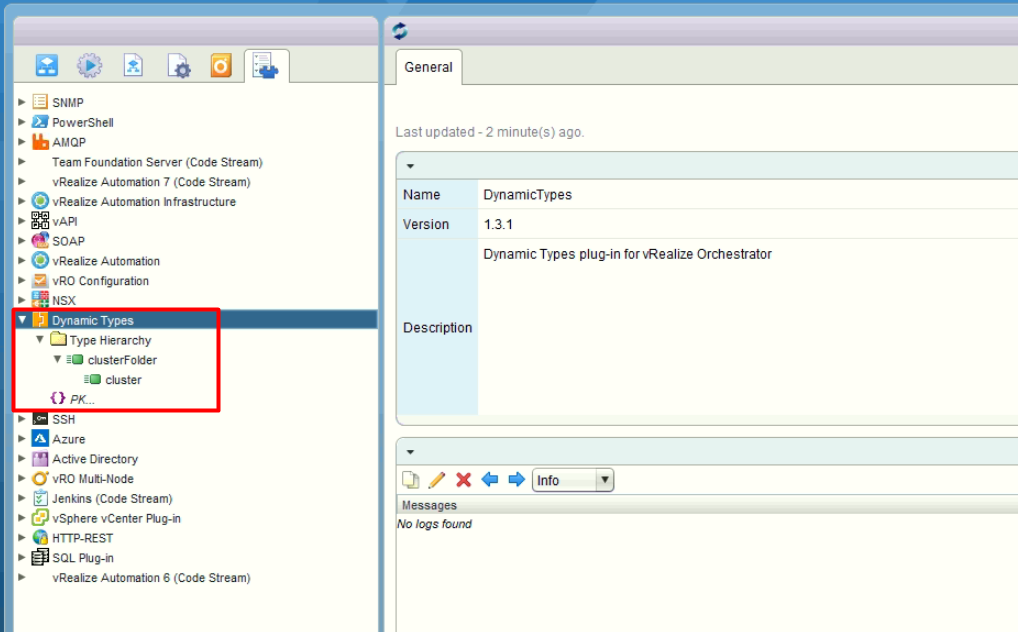
 The VRO structures after relationship created
Then the steps for the coding:
- Create Helper workflow to get detail information of the cluster. We then create a JSON string.
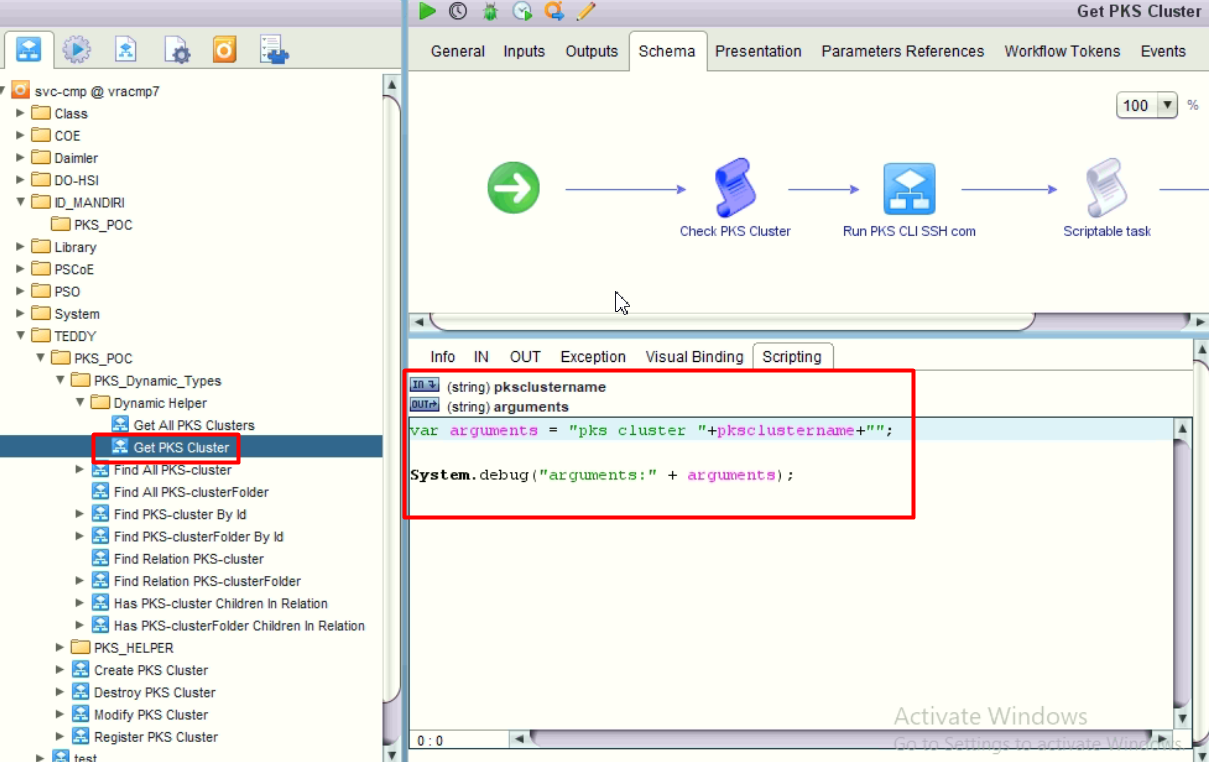
Here’s the script to parse and create JSON string object.
1 | //[pksversion, name, uuid, plan, state, clusterip, workers, externalfqdn] |
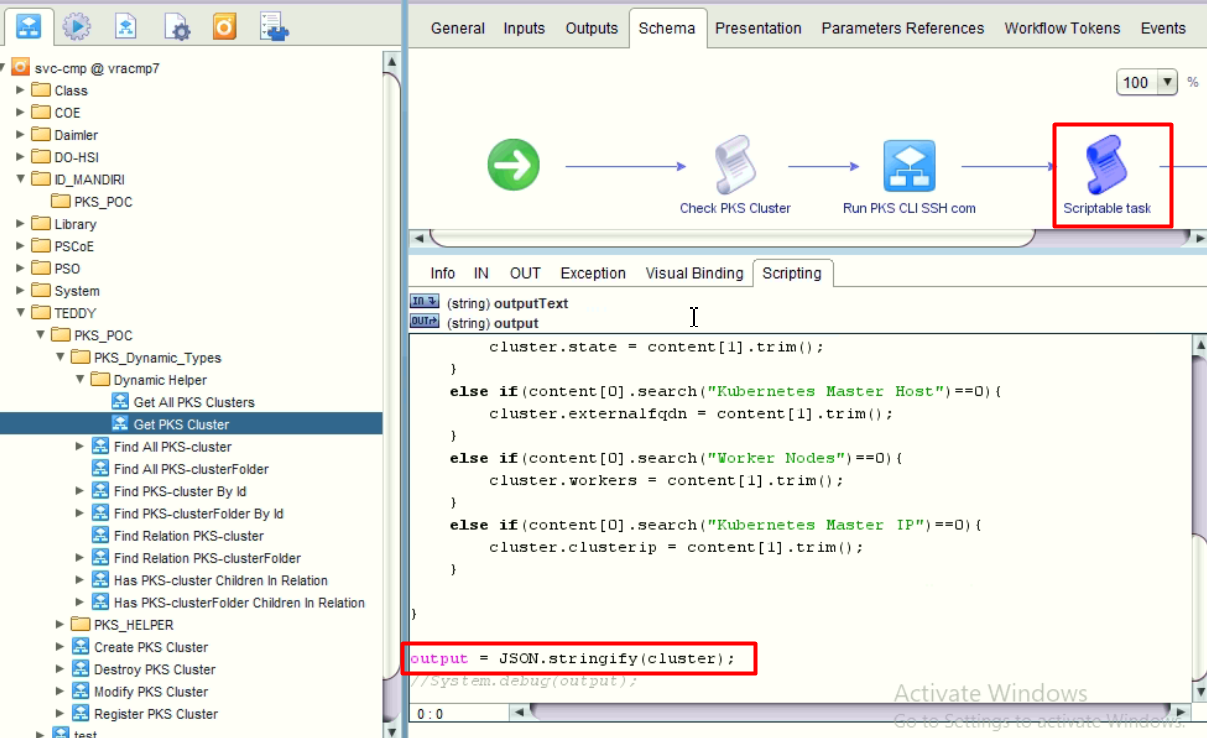
- Create another helper workflow to get all the clusters.
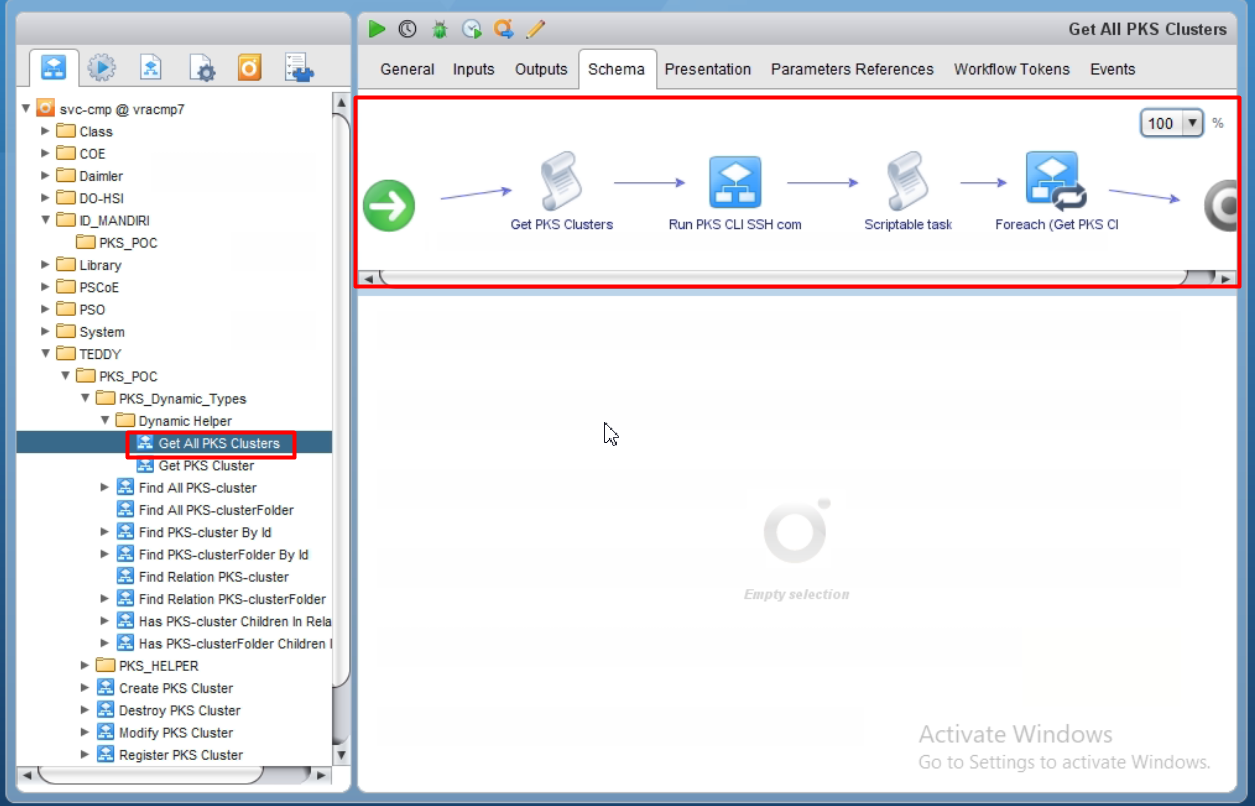 Script snippets:
bash script to get all clusters with only cluster name
1
2
3
[root@cmppksclient ~]# pks clusters |grep -i succeeded | awk '{print $2}'
teddy-cluster-02
teddy-cluster-01javascript to construct the array of string
1
2
3
4
5
6
var items = outputText.split('\n');
var clusters = [];
for each(var item in items) {
if (item.trim().length != 0)
clusters.push(item);
}
- Defining the “Find All PKS-cluster” workflow by utilizing the helper workflow then construct the array of dynamic cluster objects. We use method parse from JSON string into javascript object.
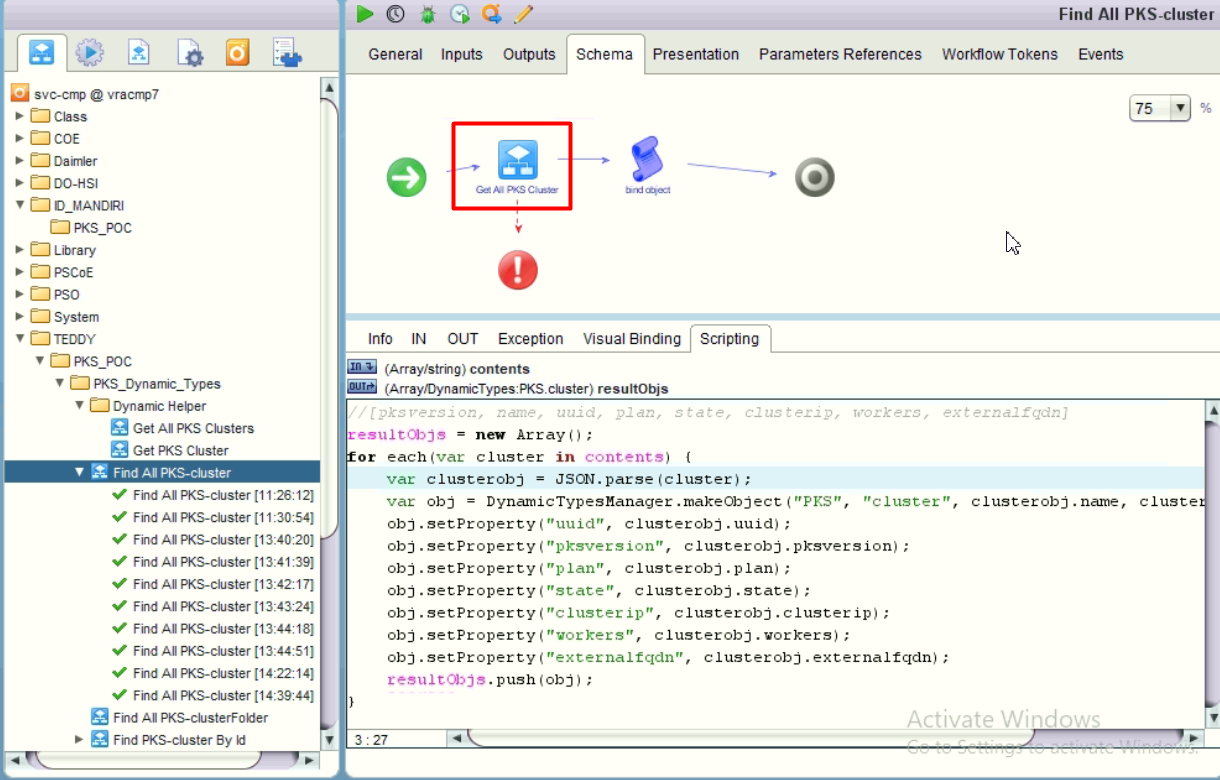
- Defining the “Find PKS-cluster By Id” workflow. This time we only require to construct single dynamic cluster object.
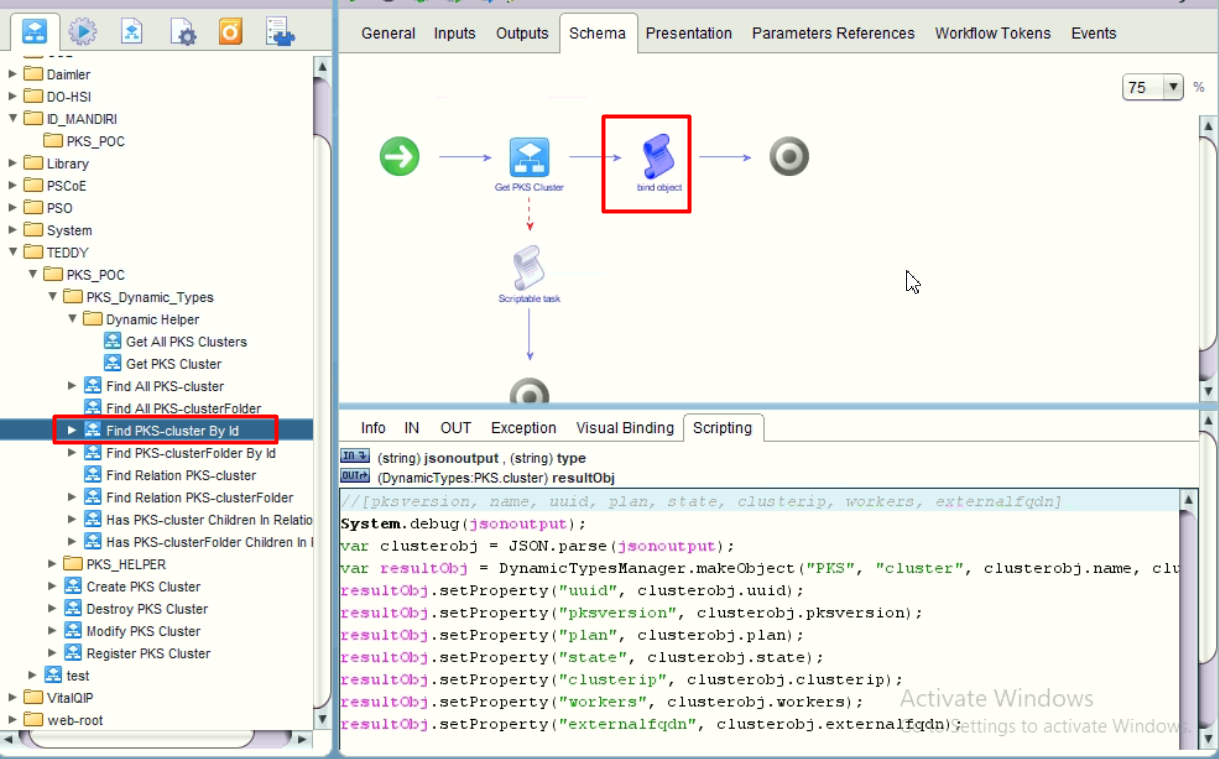
- Defining the “Find Relation PKS-clusterFolder”.
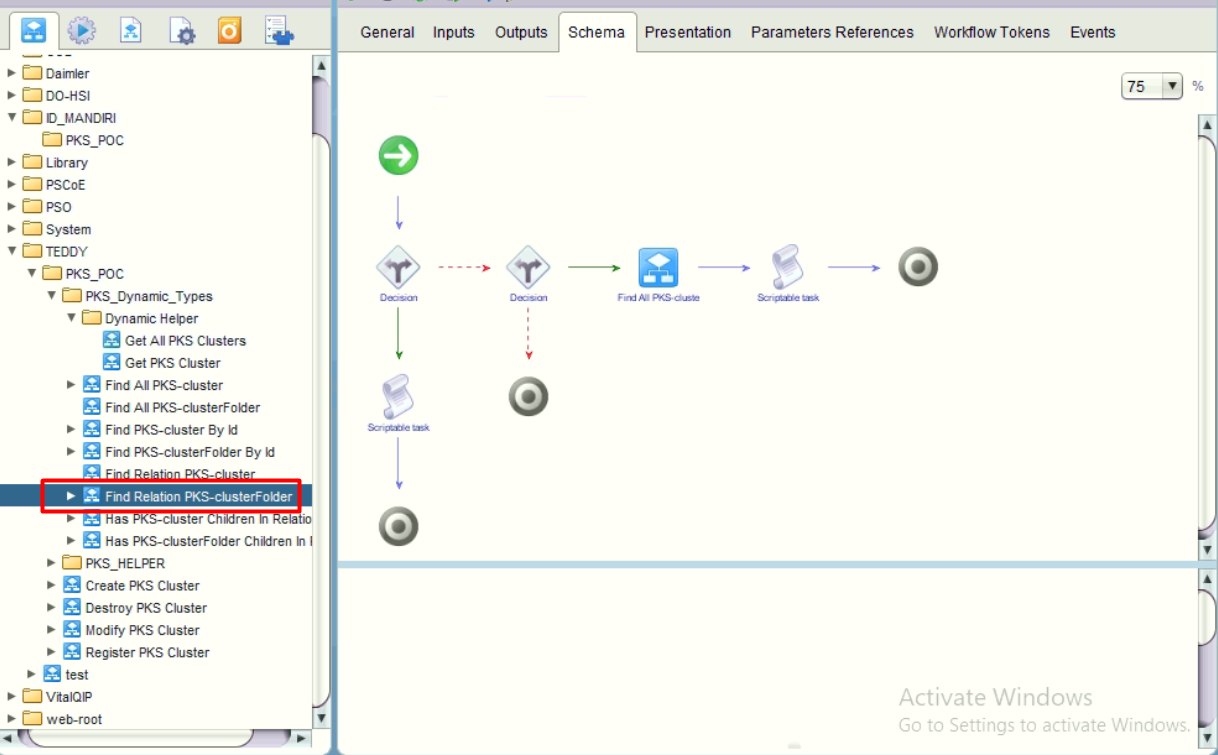 The logic is:
If this is the first structure by using decision “namespace-children”, if yes, then create new dynamic object as clusterfolder.
1
2
3
resultObjs = new Array();
var obj = DynamicTypesManager.makeObject("PKS", "clusterFolder", "clusterFolder", "Clusters", new Array());
resultObjs.push(obj);If this is folder to cluster structure by using decision “clusterFolder-cluster”, if yes, then generate all clusters objects by utilizing the workflow “Find All PKS-cluster” that we define at step #3 above.
b. Create VRA custom resource
Create custom resource:
c. Create VRA XaaS Blueprints
Create a XaaS blueprint:
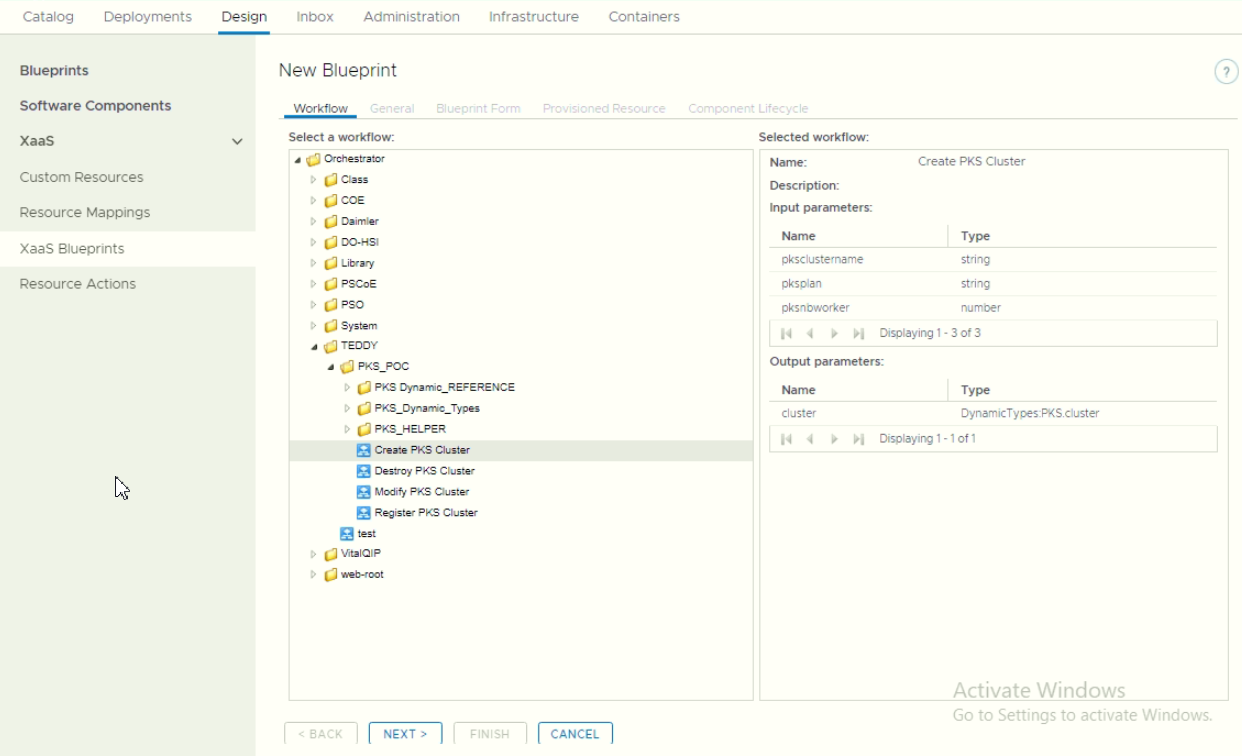
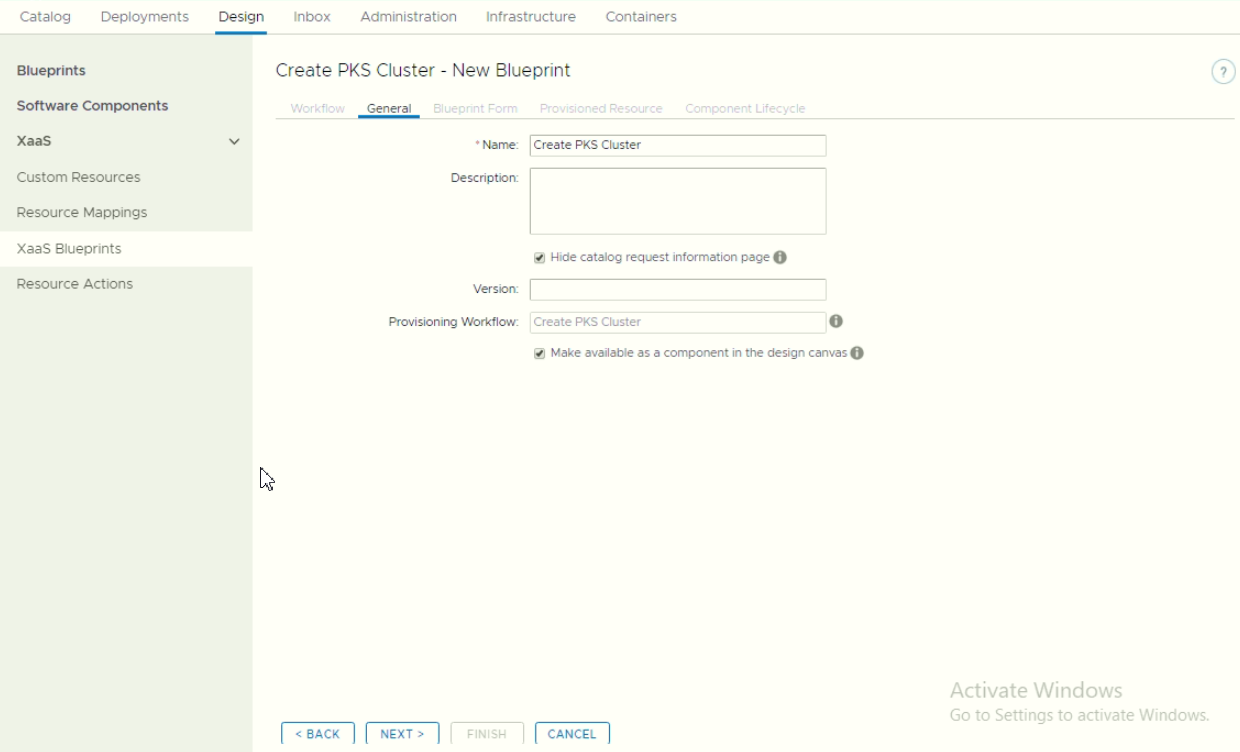
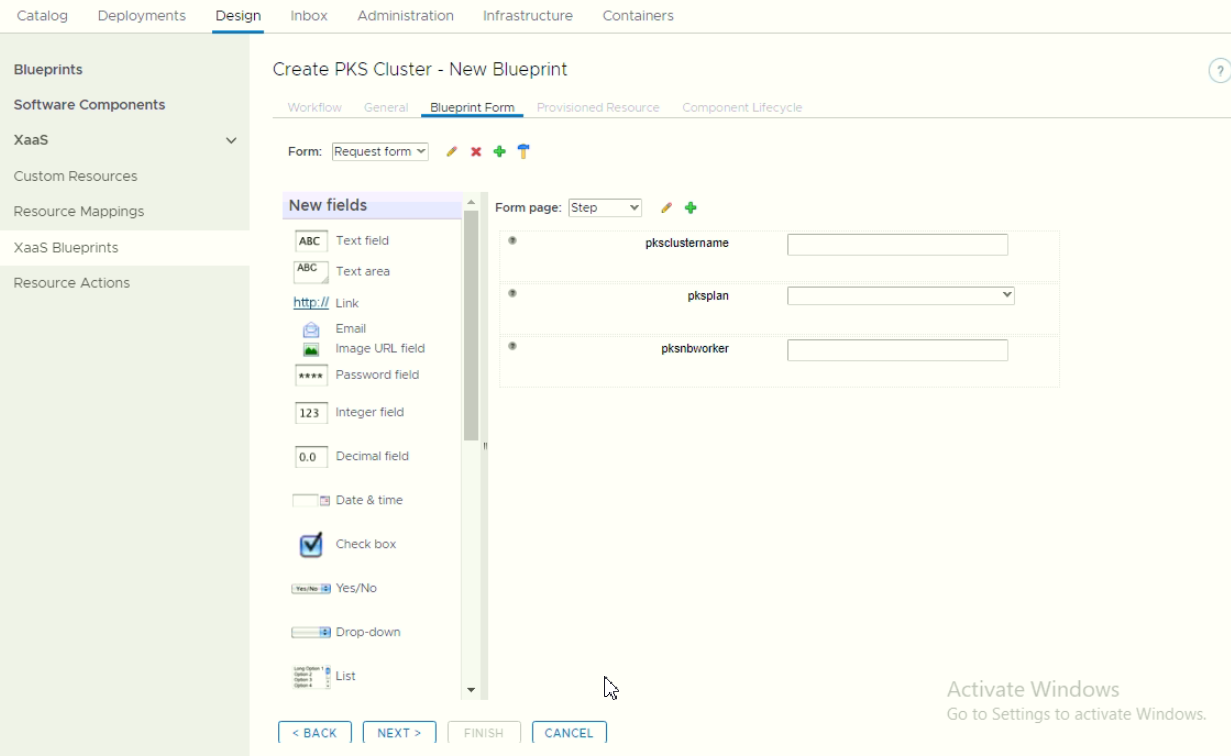
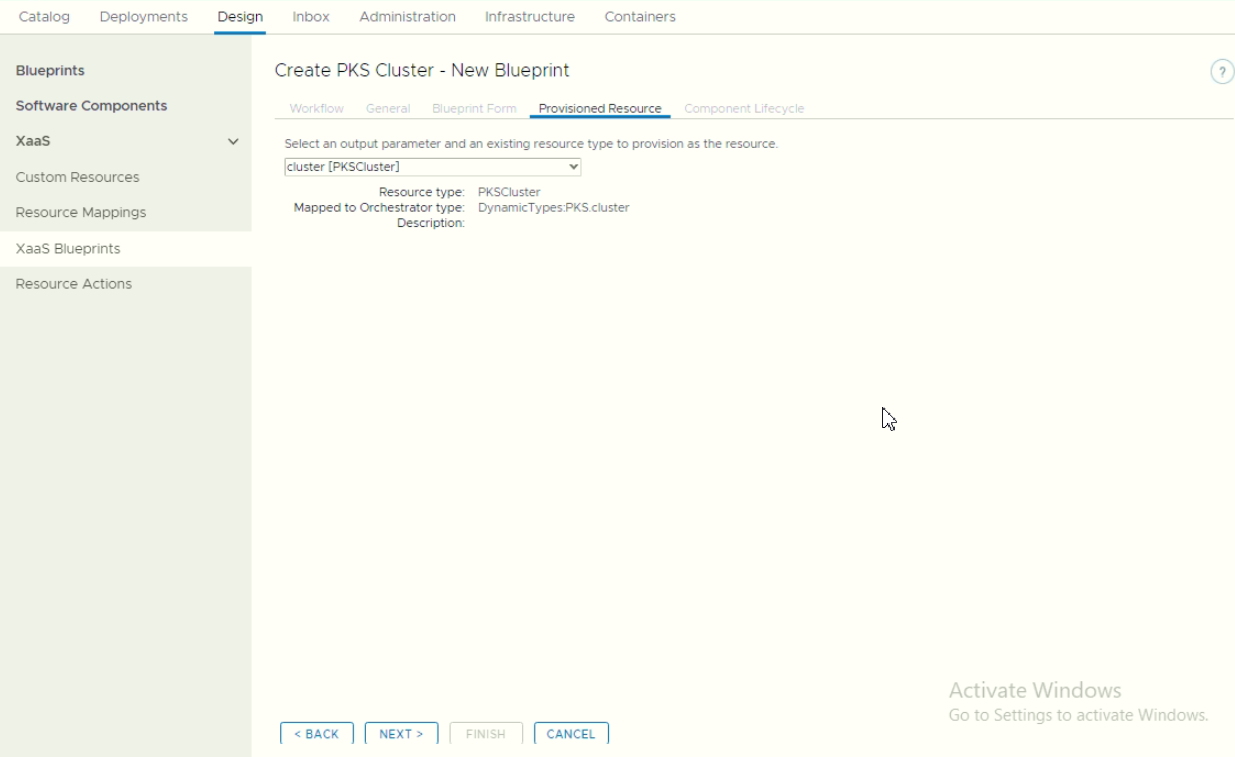
Make sure to bind the custom resource object during tab “Provisioned Resource”
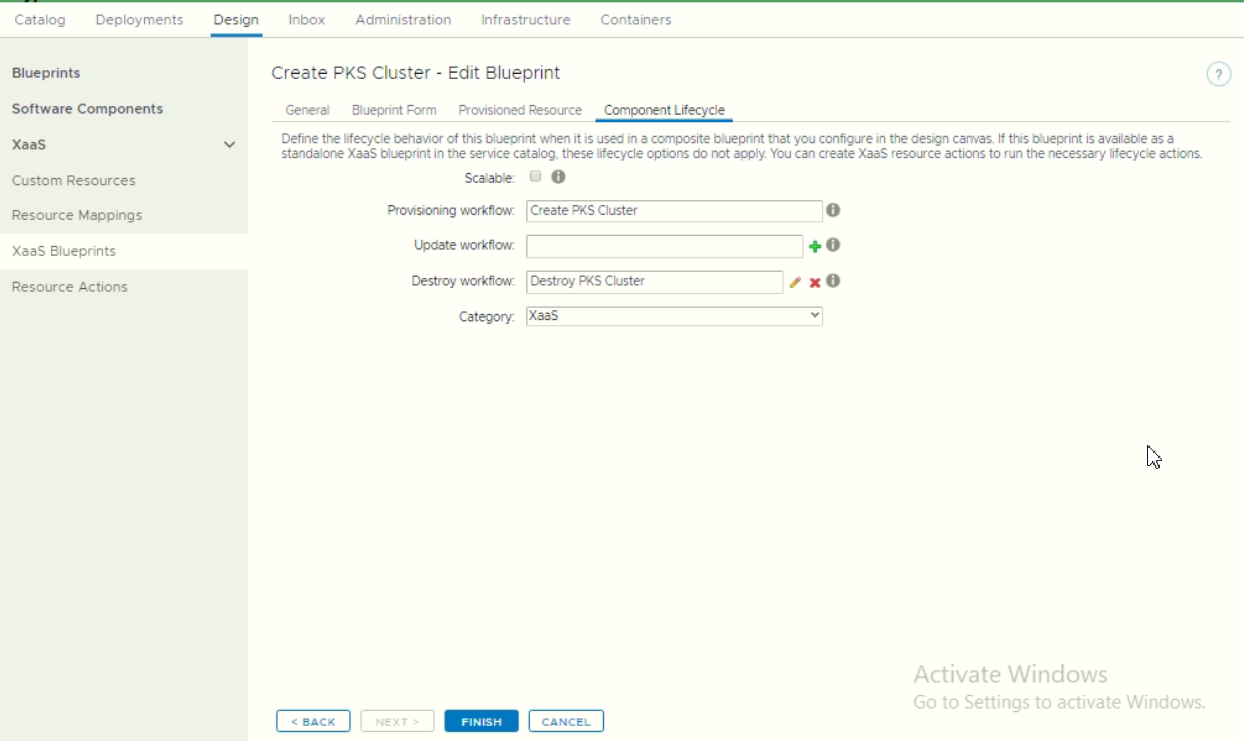
Optional: If enabling as blueprint canvas, then configure the component lifecycle. Make sure to bind the destroy workflow.
d. Create VRA Custom Actions
- Create custom actions for Modifying Cluster
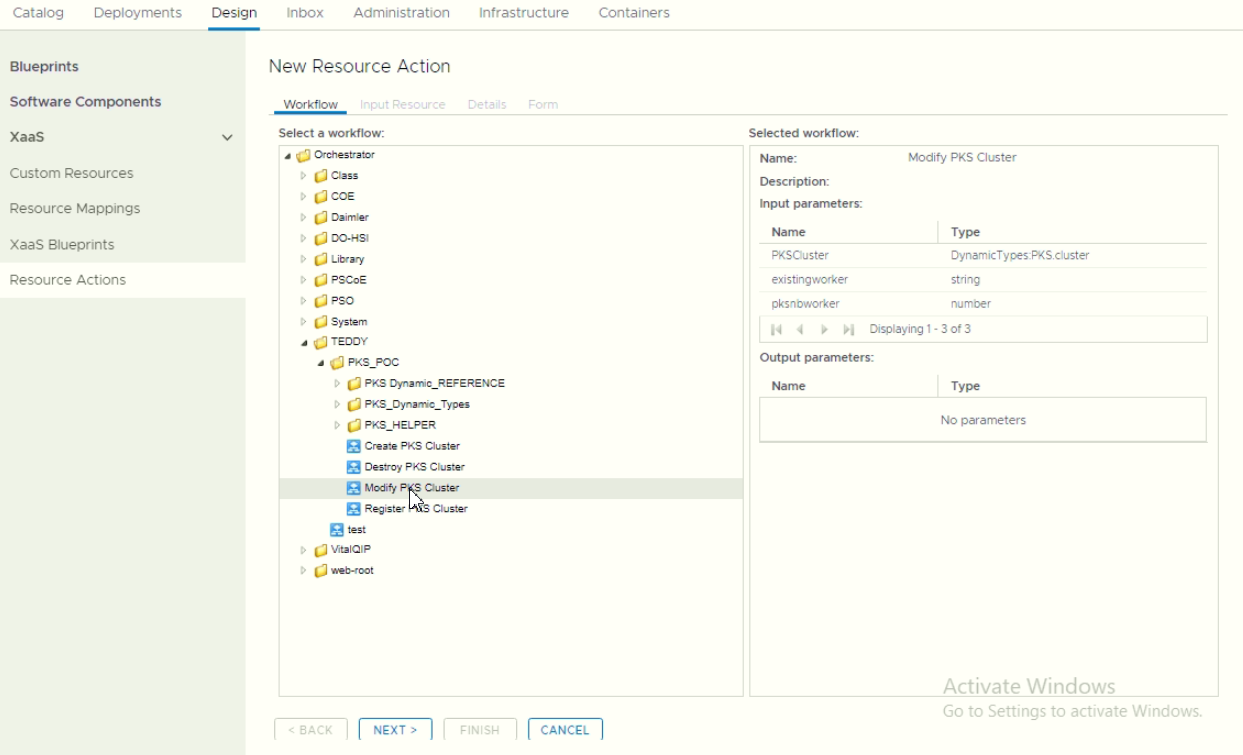
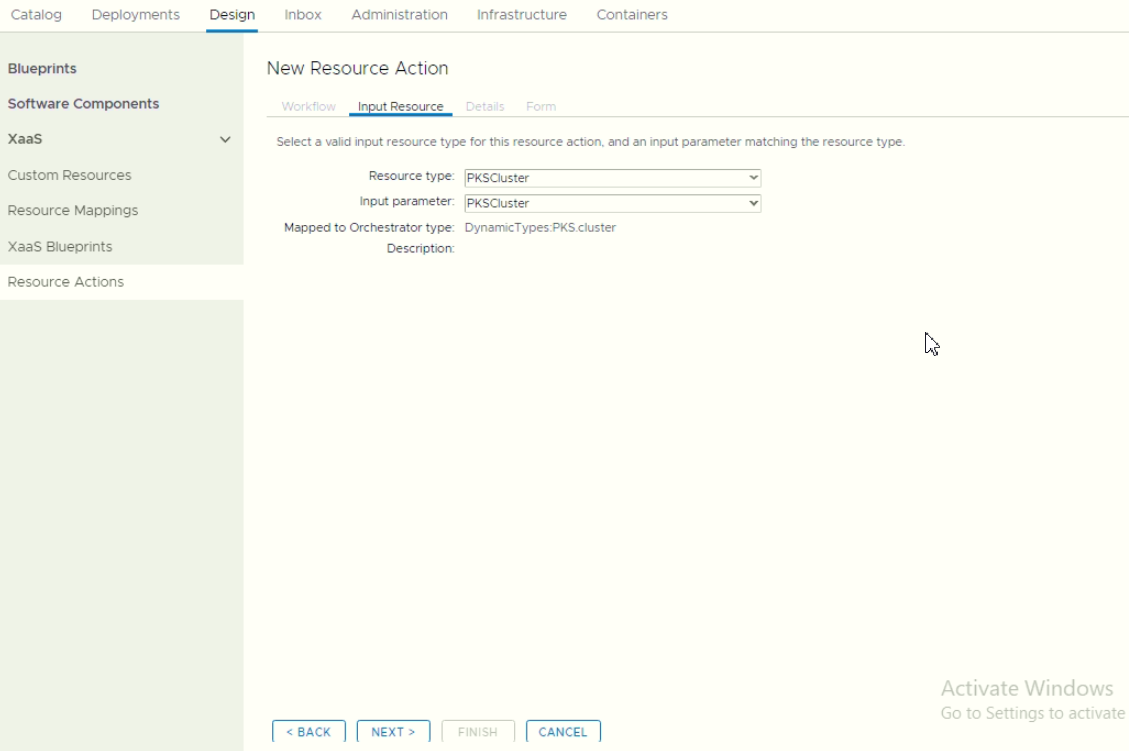
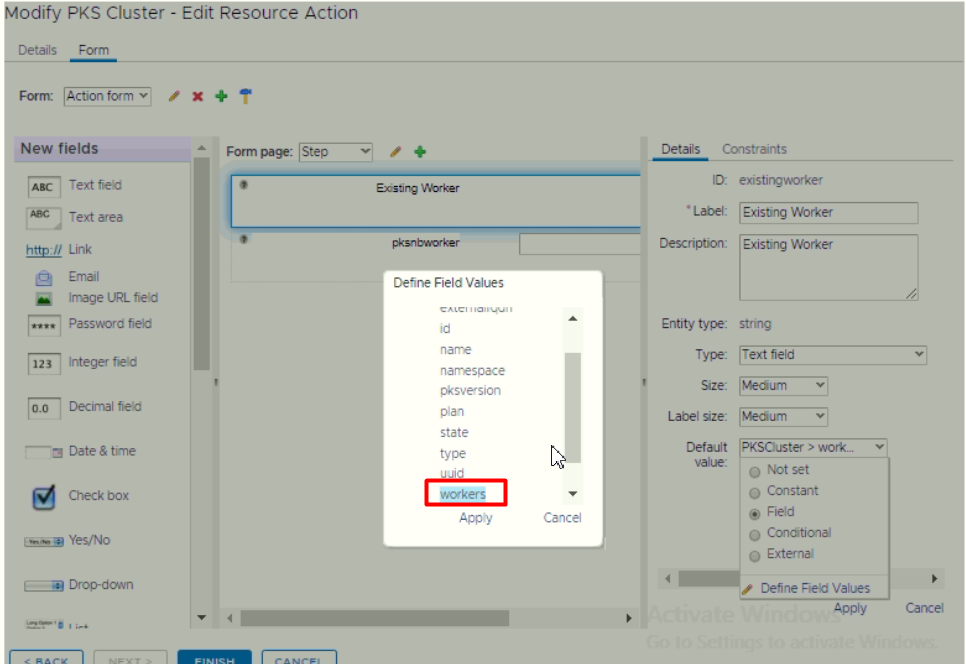
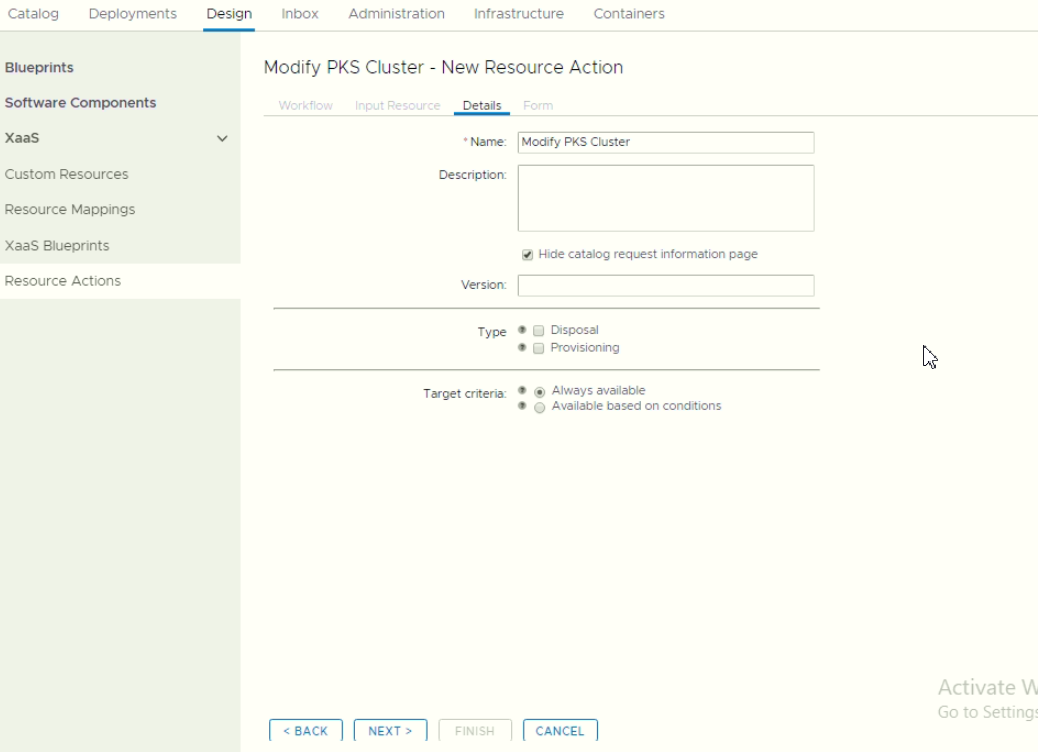 During modifying Form, we able to bind existing object into the form. In this POC, we bind the number of existing worker in the default value.
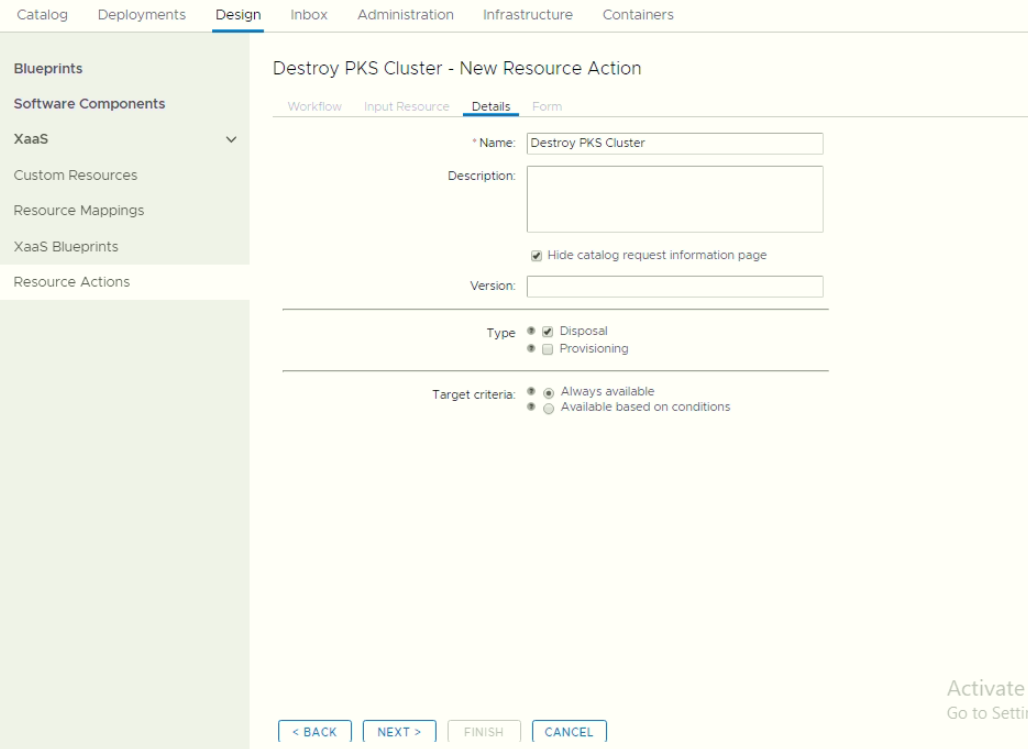
- Create custom actions for Destroying Cluster. On this actions, make sure to enable disposal
e. Define the Service and Entitlement
- Add XaaS blueprint into Service

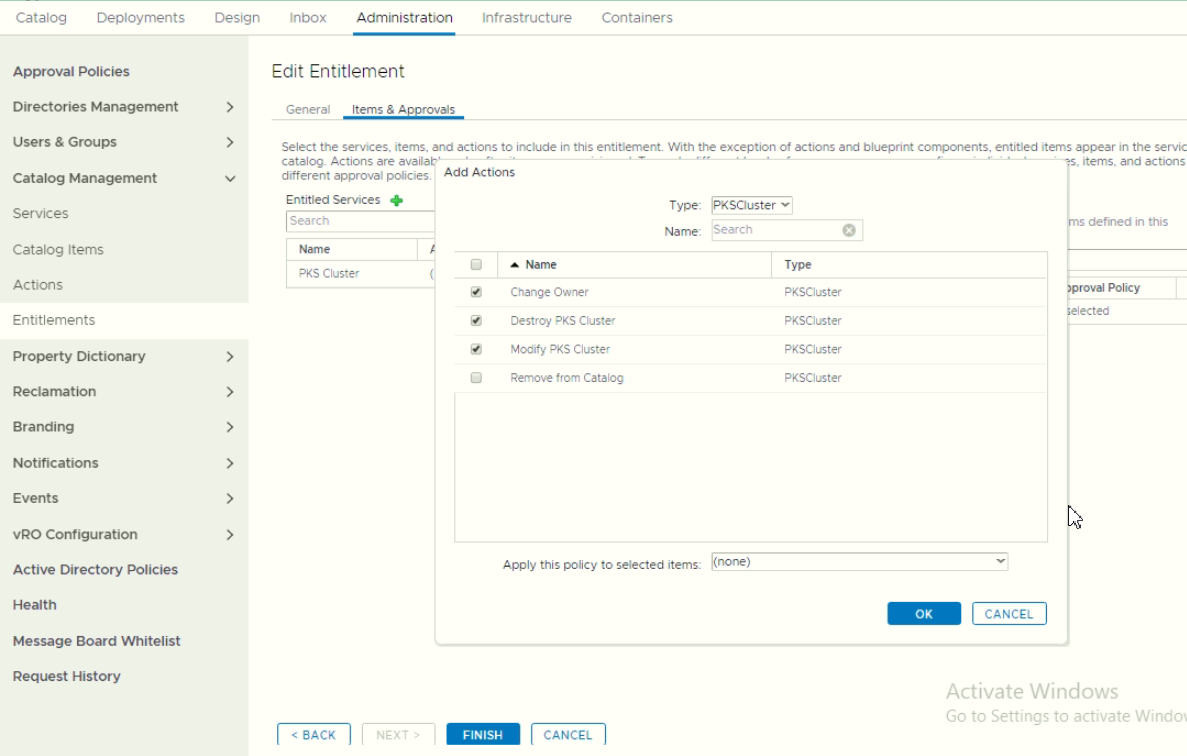
- Define Entitlements
Horree.. Finally after this long steps, we can try to request the catalog.